Showing posts with label Recipes. Show all posts

Tuesday, October 29, 2013

Back to traditions!

It's a wintery morning here on the farm and it would be quite beautiful if it weren't for the fact that we still have many acres of corn to harvest before winter really gets here.  Hopefully this little dusting of snow is it until we're done! (just putting my order in!!)

Over the weekend, we had a blast at our annual, which has turned into our tradition.....pumpkin carving and watching the Disney Halloween classic "Hocus Pocus" (my personal favorite!).  The whole event is quite fun as we carve some pretty cool looking pumpkins, decorate sugar cookies, do a craft or two, eat yummy soups and finish the evening off with the movie!.  Probably the best part for me, is that this has become a tradition in our family.  This being our third year, we believe constitutes tradition.  How many of you have a similar event or some type of tradition that can be passed down from generation to generation?  It's sad to think that many of the traditions in the whole world have been lost.  It is time to reclaim that and all families unite and if not bring back an old tradition, create a new one!  That is your mission.  With the holidays right around the corner, I'm sure there are many traditions that families still carry on,  So hands up high, with a whoop-whoop - traditions here we come!


The pumpkins are all ready for the carving event to begin. There are no awards or anything like that, just the thrill of making art out of a pumpkin!


As you can see, the carvers are working their magic on the pumpkins with serious determination - okay not too serious!


Even though our granddaughter had her own pumpkin to decorate, she was more interested in eating the frosting off her newly decorated cookie.


This year's craft was an "after Halloween" clearance item from last year.  My daughter LOVES to shop the clearance aisle after every holiday and I must admit she scores some pretty good deals.


Before we could settle down to watch the movie, we collected goodies to bring home to share. Halloween Bark was a new recipe I just had to try and it was DE...licious, thanks Ree from Pioneer Woman!  Holly's famous sugar cookies (recipe to follow) and a fun spin on cupcakes, recipe courtesy of Six Sisters Stuff. Thanks ladies! The cute felted magnet owls (Target 2012) was the craft that everyone created.


We anxiously awaited for the darkness, so we could light our newly decorated pumpkins.....ahhhhh....ooohhh......so spooky and really cool!

Thanks Allie, Danielle, Holly, Katie and Parker for making tradition!

-Happy Halloween and hugs from Julie-

Holly's Famous Sugar Cookies
Printable Recipe
Sugar Cut-Out Cookies with Buttercream Frosting:
1 c. butter                                            3 1/4 c, flour
1 c. sugar                                             1/2 tsp. baking powder  
2 eggs                                                   1/2 tsp. baking soda
1/2 tsp vanilla extract                          1/2 tsp. salt

Combine butter, sugar, eggs and vanilla with mixer until light and fluffy.  Combine the flour, baking powder, baking soda and salt; gradually stir flour mixture into butter mixture until well blended.  Chill dough for 2 hours.

Preheat oven to 400 degrees.  On a lightly floured surface, roll out dough to 1/4 inch thickness.  Cut into desired shapes.  Place cookies
 2 inches apart onto ungreased cookie sheets.  Bake for 4-6 minutes.

BUTTERCREAM FROSTING:
1/2 c. butter flavored shortening            1 lb. powdered sugar
1/4 tsp. butter flavored extract                5 Tbsp. water
1/4 tsp. salt                                                1/4 tsp. vanilla extract

Beat all ingredients until fluffy.  Add food coloring to make desired colors.

Tuesday, October 22, 2013

Guest food

Hello there - it's time we talk about food again.  Over the weekend, we had guest, Dave, stay at our home and help us with harvest.  Wait - that's how we treat our guests.....we make them work?!?  Actually, Dave is a guest, but more than that, he is our cousin and we LOVE when he comes to help us.  He's been helping on the farm since he was just a kid.  He grew up in the city, but his heart is in the country.  Now what does all this Dave talk have to do with food.

It's great to have guests, cousins, farm help come and stay because I get to cook.  Okay, I cook all the time, but when guests come, I get to cook for more than two people.  It's not easy cooking for two people because I'm used to cooking for harvest crews - you guessed it - we eat a lot of leftovers.  It's so awesome when I can cook for guests because number one - they tell you they appreciate it (not that my dear hubby doesn't - it's just...yeah) and not that I need the appreciation, but darn it feels good!  Number two - more than two people, no leftovers.

Stepping out of my comfort food zone, I'm out to try new recipes.  This one is absolutely fabulous and I had to share.  It is not my creation, but that of quilting/stitchery friend, Karen Perry.  Guest/cousin/farm help Dave even wanted the recipe.  Whoa - that's way cool, so he's guest/cousin/ farm help/chef!

I'm sending you to Karen's blog post for the recipe and her great decorating style.  I believe she's my new idol!

My Yellow Farmhouse - stroll through her home to the end of the page and that's where you'll find the recipe for Savory Italian Rounds

Here's my version...


Enjoy!
-Julie-

Savory Italian Rounds
  • 2/3 cup grated Parmesan cheese
  • 1/2 cup regular mayonnaise - do not substitute low fat or fat free
  • 1/4 dried basil
  • 1/8 tsp garlic powder
  • 1/8 tsp garlic salt
  • 1/8 tsp dried oregano
  • dash onion salt
  • 1 tube  of refrigerator buttermilk biscuits - I used the Pillsbury Grand biscuits
In a bowl mix together the mayo, cheese and spices.  Remove biscuits from the package and let sit on ungreased backing sheet for about 5 minutes to warm up a bit - flatten each one into about a 4" round.  Spread a tbsp of the cheese mixture on each biscuit within 1/2 inch of the edge.  Bake at 400 for 10 - 13 minutes.  Serve.  These would be great with soups, stews or salads.  Yummy and easy and something you can have ready to go quickly.   

Tuesday, September 17, 2013

Time for soup!

The leaves are putting on new colors, the crops are drying down ready for harvest, it must be Fall! And that means "soup time".  Many of you have already put up your jars and freezer bags full of tomato based products, but in case you have a few left, you need to make a pot of homemade tomato soup.  If you loved Campbell's tomato soup as a kid or maybe you still do, once you have a bowl of homemade tomato soup you can't go back - (sorry Campbell's, I still love your cream of.....whatever soups).

This recipe is not mine by design, but taken from the recipe book my mother gave to me as a bridal shower gift a mere 32 years ago.


If you have the book, turn to page 110 and 111.  For those of who you don't, let me be your guide through the process.  The recipe is super easy, just be patient when stirring!


 In a saucepan, combine 4 cups of tomatoes, onion, bay leaf, sugar, 1 teaspoon of salt and pepper.


Bring to boiling; reduce heat and simmer about 10 minutes.  (It is not necessary to peel the tomatoes, since the skins will be removed as the mixture is sieved)  TIP: Blending the tomato mixture instead of sieving it is an alternate method for making the tomato puree.  However, more seeds will be left in the tomato mixture with blending than with sieving.  For a smoother soup from the blender or food processor, be sure to peel the tomatoes before cooking them.


Place a sieve over a bowl.  Add the tomato mixture to the sieve; press the tomato mixture through with a wooden spoon or rubber spatula to strain the juice, as shown.  Discard the pulpy mass left in the sieve.  (or you can process the mixture in a blender or food processor, just be sure to take the skins off the tomatoes before cooking).  Set aside the hot strained mixture (you should have about 2 cups).


In the same saucepan you used for cooking the tomatoes, melt the butter over low heat.  Blend in the flour and a 1/2 teaspoon of salt.  Stir with a wooden soup till no lumps remain.  This is the first step in making a white sauce, which is the base for this soup.


With the saucepan over low heat, add the milk all at once.  Stir constantly to distribute the butter-flour mixture throughout the total amount of cool milk.  This is easier than blending it with a small amount of milk at a time.  The butter-flour mixture and the milk must be well blended to prevent lumps from forming.


Cook over medium  heat, stirring constantly in a figure-8 motion so that the sauce is heated evenly throughout.  Vigorous beating or stirring will break down the particles in the flour, making the sauce slick rather then smooth and velvety.  Use a wooden spoon for more comfortable stirring (and patience!) Continue cooking till the mixture thickens and bubbles across its entire surface.  This thickening results when heat expands the starch particles in the flour.  Cook 2 minutes longer to ensure that the flour is fully cooked and will not taste starchy.


Slowly add the hot tomato mixture to the white sauce, stirring to blend.  Heat through.  Do not heat mixture too long or allow to boil.  The acidity of the tomatoes can cause the milk to curdle when overcooked.  Serve immediately. (Notice that there are chunks of tomatoes in the pot - my hubby likes it that way, so I add a cup or two of diced/chopped tomatoes after adding the tomato mixture.  You can use ripe tomatoes or a can of diced tomatoes - both work great!)


Oh for Yummy!
-Julie-

Cream of Tomato Soup (with tomato chunks,  my addition to the original recipe)
Click here for a printable version

4 cups of chopped ripe tomatoes
  (if you would like to have some tomato chunks in your soup, add 1-2 more cups of chopped tomatoes to     the soup after you add the hot tomato mixture before serving or you can add a can of diced tomatoes if you   don't have enough tomatoes)
1/2 cup of chopped onion
1 small bay leaf
1 teaspoon salt
1/4 teaspoon pepper
4 tablespoons of butter
4 tablespoons of all-purpose flour
1/2 teaspoon salt
4 cups milk

In saucepan combine the tomatoes, onion, bay leaf, sugar, the 1 tsp. salt and the pepper.  Bring to boiling; reduce heat and simmer about 10 minutes.  Sieve the tomato mixture to make about 2 cups; set aside.  In the same saucepan melt the butter; stir in the flour and the 1/2 tsp salt.  Add milk all at once.  Cook and stir till thickened and bubbly.  Cook 2 minutes more.  Slowly add hot tomato mixture, stirring to blend.  Add diced/chopped tomatoes if you would like chunks of tomato in your soup instead of just being creamy. Heat up gently, not to overcook and serve immediately.  If desired, garnish soup with seasoned croutons, crumbled crisp-cooked bacon, sour cream, etc.


Monday, September 2, 2013

The fair is over, summer is over- boo!

Happy Labor Day to all!  If you are laboring today, enjoy knowing that you have a job.  If you have the day off from your job, enjoy the day off knowing that you have a job.  Whoops - guess I kinda got into that job thing.

From a few posts back, I refer to our holidays as working days, this one being no exception, however we had a pleasant surprise as we worked on spray/farm records in the office.  I thought I heard a helicopter go over the house, but than I heard another one?  What's going on?  We went outside, checked the sky and the helicopter was landing in our yard?!?!?  It was our good friend, Kurt Myron out for a solo flight.  It looked really cool, but not on our bucket list.  To ride in one - yes, to drive one - no way!  Thanks Kurt for "stopping" by!

Now this is the way you visit your friends!

The last day of the state fair is today, which sadly means, summer is over and we say boo-hoo!  However, we wanted to share one more "taste" of the fair with you about our favorites.  I had to try "Hotdish on a Stick" - ta tor tots and meatballs on a stick dipped in a hotdish sauce ( most common sauce created with cream of chicken, cream of mushroom soup, milk and/or cream) and than of course deep fried.  Amazingly yummy?!

"Hotdish on a Stick" (doesn't everything look good deep fried?)

Yes, it does say Ole and Len's Hotdish on a Stick - crazy Norwegians!!
 Cheese curds are always on our radar, price the same as many years ago, BUT the portion MUCH smaller - so had to eat two!
Cheese curds are still quite yummy, but do you see the size - tiny!!!!!!!

  Walleye on a stick by locals Paul and Shellee Hansen  are a must and Andrew Zimmern of Bizarre Foods visited them too!  Sweet! Maybe they'll be celebrities on TV as well.....hmmmm!

Now serving smelt and catfish along with their signature walleye.

Paul and Shellee are the cutest couple - they've been serving Walleye on a Stick for 23 years
(Gotta dig Shellee's eyewear - she's calls them her fry glasses - she's chief fry master!)

 One newbie we tried, sweet corn ice cream.  I thought it was delicious.  Randy wasn't keen on the sweet corn chunks in ice cream ( you must know that his favorite ice cream is vanilla or white as our granddaughter calls it - so that explains his appetite on ice cream products).  There were several more items such as pronto pups, beer, mini doughnuts, beer, Sweet Martha's cookies, beer - you get the idea.  In our defense, the temps were in the upper 90's - and we took the bus, so we had fun!

I say- What?!?!

Dear hubby trying the ice cream in the very appropriate T-shirt for the day!

  See the little bits of sweet corn.  A praline nut, graham cracker mixture is sprinkled on top.


 Speaking of chocolate chip cookies - did you know that Sweet Martha makes 12 million - yes I said million - cookies in 12 days! (just to make sure my accounting head is on right for working today), that's 1 million a day!  Yikes!  I'm thrilled when I get a couple dozen made for the cookie jar.
A cup of freshly baked chocolate chip cookies......yummmmmmmm!

The sign should read "Where 1 million cookies are made everyday!"

  I don't have her famous recipe but I do have one of my own that I will say is pretty darn good and it's my recipe this week.  It was a harvest favorite and continues to be the one cookie recipe that gets made again and again.  We change out the chocolate chips for peanut butter chips or M & M's and even the toffee chips are excellent.  Have fun making, what should we call them....oh I know.....Cool Juls cookies - what do you think?  Too much?

Have an awesome day however you are spending it!

- Julie ( I mean Cool Juls) -

Cool Juls Cookies
(Click here for a printable version)

1 c. butter shortening
1/2 c. butter, softened
1 1/3 c. white sugar
1 c. packed brown sugar
4 eggs
4 tsp. vanilla
4 1/2 c. flour
2 tsp. baking soda
1 1/2 tsp. salt
2 c. milk chocolate chips or peanut butter chips or M & M's (I prefer the mini ones) or a mixture?!?

In mixing bowl cream shortening, butter and sugars until light and fluffy.  Add eggs, one at a time, beating after each.  Add vanilla.  Combine the dry ingredients and add to the creamed mixture beating well.  Stir in chips. Using a cookie scoop (I like the medium size) place scooped cookies on lightly greased baking sheets at 350 degrees for 14 minutes.  Let cool on baking sheets for 3-4 minutes and transfer to cooling trays.  Let cool completely before placing in cookie jar. Note:  I like the cookies to be light in color, slightly underbaked, as they continue to bake on the sheets after taken out of the oven.

This recipe makes a bunch of cookies, several dozen, depending on the cookie scoop size of your choice.

 My Tip:  I like fresh cookies and not ones that have sat in a container for days or baked up and in the freezer for weeks or months.  When I whip up a batch, I will bake one cookie sheet worth and freeze the rest into scooped balls before baking.  Some people get nervous about this because the eggs have not been cooked.  I have had no issues in the 30 plus years I've been making these cookies because I freeze them right away.  When I need to replenish the cookie jar, I just take out as many cookies as I want to bake, thaw in the refrigerator till softened and than bake them.  How wonderful to have fresh baked cookies, just like Sweet Martha's at the fair!


Tuesday, August 27, 2013

The Great Minnesota Get Together - Part One

Did you miss us?  Sorry, we took a bit of time to catch up with ourselves the last couple of weeks.  Summer finally arrived in Minnesota this year and we had to take advantage of it - yep we know it's August, but that's how it goes here in our part of the world.  Speaking of summer and August, we just had to go to The Great Minnesota Get Together, our state's fair.  We hadn't been in many a year so thought it was time to see what we were missing.  In the process of deciding on which day or days would be the best (the fair runs for 12 days), we were invited by our farm marketing consultant to tag along to take photos and blog about his family being a part of the Travel Channel's show "Bizarre Foods" with Andrew Zimmern.  This particular TV show will  be based on the food that is served at the state fair, especially the not-so-normal food fair variety.

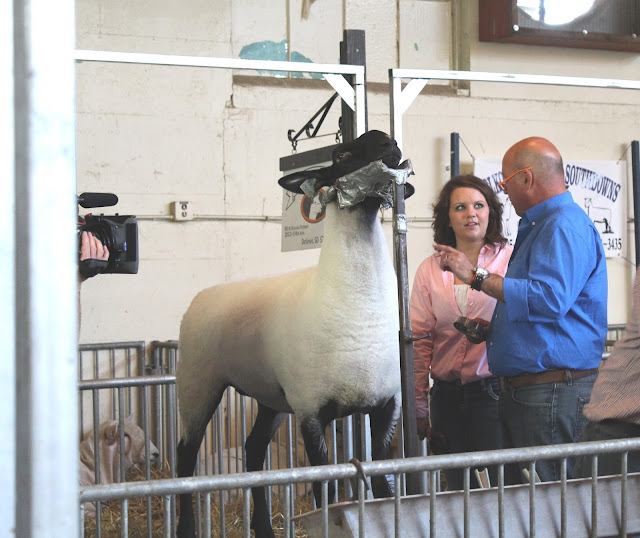
Television crew of  "Bizarre Foods" getting set up for the taping of this show. Bret Oelke is watching for Andrew Zimmern, the shows creator to arrive.
And here he comes.....walking down the sheep stall aisle.

 Now how did the Oelke family from Barrett, MN get to be a part of this gig?  Bret and Lorie and their family are well known for their multi-generational raising and showing of sheep at the county and state fair level.  You know that phrase, "it's not always what you know, but who you know" - well, with Bret's extension and marketing career he has become acquainted with several different entities that deal with agriculture and foods.  A member of the TV crew, whose father has been in charge of the sheep barns at the state fair for many years, knew exactly who to contact when "Bizarre Foods" decided they wanted to have an unusual "food to fork" segment as a part of the show.
"The Taping"
Andrew visiting with Jackie on camera about what she needs to do to get her sheep ready for showing. 

 Mr. Zimmern (Andrew) and his crew followed the Oelke family as they entered the fairgrounds, nestled their sheep in their 4-H and Open Class stalls and learned about the raising of sheep not only for show but for food.  Andrew especially liked the idea of eating mutton (which is not a typical food in most households or one eaten at the state fair).  The Oelke family served up a mutton sausage with sauerkraut, peppers and onions on a bun.  It was very tasty!

Mutton sausages smothered in peppers and onions, cooked in a crock pot and YES right in the sheep barn!
Andrew and Bret talking about the end product of the mutton sausages and ready to take a bite!

The crew also followed Jackie, the youngest daughter, as she showed her sheep at the 4-H judging (where she earned 2 Grand Champions - way to go Jackie!).
Jackie showing her Grand Champion!

 It will be interesting to see when the show airs if they tie the whole thing together with the raising of animals, in this case, sheep.  How they are not raised as pets but as food and where that food actually comes from.  Bret, Lorie and family in their travels and our family in our travels find that many, MANY people believe that food comes from a store.  (Do you know of any stores that you raise, nurture, show and than eat.....hmmmmm).  It is a comfort that the world is talking about food and its' origins, but they need to know the real story and how important it is that genetic testing and modifications are available because it's a plain fact that no more land is made on this earth but yet our population keeps growing.  We need to figure out a way to feed everyone so no one goes hungry.  Okay enough on my soapbox....
The family asked Andrew if he would sign their sheep jackets.
 Note: The jackets keep the sheep clean for showing.

Bizarre Foods - Andrew Zimmern's calling card!  Pretty neat!
It will be super exciting to see the show on TV because we were right there during the taping.  We'll keep you posted on when that will be.  A special thanks to Bret, Lorie and family for letting us be a part of your family's TV debut and for being advocates of agriculture.  You guys rock!
Visitors in the sheep barn were wondering what was going on.....recognized Andrew Zimmern and watched the taping!
My hubby even got in on the action as the "gate keeper".  He watched the area so the camera crew had plenty of room to work in.  This was not a studio set-up, the filming was right in the sheep barn with all the other events going on.
Gotta love that Douglas County Corn and Soybean Growers T-shirt!

 And as the director said at the end of the taping - "That's a wrap!"

Thanks for reading - Julie - 

P.S. Here's the famous recipe - try it for yourselves!

Oelke Family Mutton Sausage Recipe
(click here for a printable version)

2# - mutton sausage (or any kind of sausage)
1 - red pepper
1 - green pepper
1 - red onion
1 - bag of refrigerated sauerkraut.

Slice up peppers and onions.  Place sausages in bottom of crock pot, place pepper and onion slices on top along with the sauerkraut.  Cook on high 3-4 hours, low 6-7 hours.  Serve on bun!  Yum-Yum!


Monday, August 5, 2013

Can it still be strawberry season? okay how about pie?

I know that I'm a bit late on posting a great recipe about strawberries but my life has been a bit consumed lately and this poor pie was left out of the loop and it wants it's star moment so here it is.....the best strawberry pie ever (at least it thinks so and me too!)

Sky High Strawberry Pie
Click HERE for a printable version

3 quarts fresh strawberries, divided
1 1/2 cups sugar
6 tablespoons cornstarch
2/3 cup water
red food coloring, optional
1 deep-dish pastry shell (10 inches), baked - Note:  I used two 9 inch shells
1 cup heavy cream
1 1/2 tablespoons instant vanilla pudding mix

In a large bowl, mash enough berries to equal 3 cups.


In a saucepan, combine the sugar and cornstarch.  Stir in the mashed berries and water; mix well.  Bring to a boil over medium heat, stirring constantly.


 Cook and stir for 2 minutes.  Remove from the heat; add food coloring if desired.  Pour into a large bowl.  Chill for 20 minutes, stirring occasionally, until mixture is just slightly warm.  Fold in the remaining berries.


 Pile into pie shell (or in my case, shells).


Chill for 2-3 hours.  In a small mixing bow, whip cream until soft peaks form.  Sprinkle pudding mix over cream and whip until stiff.  Pipe around edge of pie or dollop on individual slices.  (Sorry no photos of the cream on the pie, I was so excited to eat the pie and the awesome cream that I forgot to take one - you will have to trust me and that I LOVE the cream and pudding mixture for whipped cream instead of adding sugar - it is YUMMY!)  Serves 8-10 with a 10 inch pie and 12-16 with two 9 inch pies.

Click HERE for a printable version

Monday, July 15, 2013

Hotdish or Casserole?

This recipe for Taco Hotdish was a favorite of our family and our harvest crew.  I haven't made it for quite some time because the recipe calls for a roll of crescent rolls and it covers a 9 x 13 pan.  (We would be eating taco hotdish all week - that's not a bad thing - however my hubby isn't a super fan of leftovers - WHAT?!?)  So...... I found the cutest crescent roll package at our local grocery store.  I had no idea that crescent rolls came in a smaller tube.  The ahh moment came to me that I would make Taco Hotdish and could use a smaller pan.

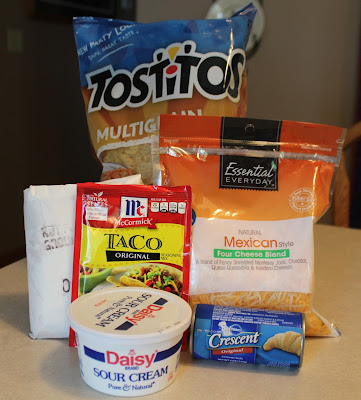
Start out by gathering the ingredients needed.  We purchase our beef from a neighbor cattle farmer and have it processed at our local meat market, hence the white package of ground beef.  My favorite kind of taco chips to use are the Tostitos multi-grain chips.  (It makes me feel like I'm eating healthier chips and they are good)!


Brown the ground beef and drain any fat.  The beef that we purchase is pretty lean so not much fat is collected - love that!  Stir in the taco seasoning with 3/4 cup of water.  Cook until most of the water has evaporated and the meat/taco seasoning mixture has a thicker consistency.

Brown hamburger until you see no pnk.
Add taco seasoning .
Open the can of crescent rolls and lay the rolls on the bottom of the pan, pinching edges and perforations together to form a crust.

Pat crescent rolls into bottom of pan
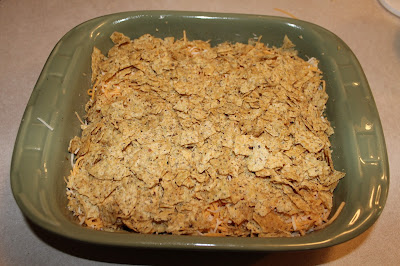
Layer in the following order: crushed taco chips (I just crush in my hand), meat mixture, sour cream, shredded cheese and more crushed taco chips

Crushed taco chips on top of the crescent rolls.
Layer meat mixture on top of the taco chips.
Spread the sour cream on top of the meat mixture.
Sprinkle the shredded cheese on top of the sour cream.
Final layer of crushed taco chips.
Bake at 350 for about 25-30 minutes until bubbly.

Take out of oven and let sit for 5-10 minutes so the hotdish is easier to cut.  As we say here in Minnesota "Oh for Yummy!"

I usually serve Taco Hotdish with lettuce, tomatoes and sliced black olives and a side dish of mexican rice. My favorite is the box mix from Rice-A-Roni.  (I do appreciate the semi-homemade cooking option).

Taco Hotdish with garden lettuce (thanks Teresa Thoennes), cherry tomatoes and spanish rice.
(Whoops, forgot the black olives)
I was once asked by a Kansas farm wife what I was making for dinner and I said Taco Hotdish.  She had this funny look on her face and said "aren't all your dishes hot?" -( in Kansas it would be Taco Casserole)
What do you call it - hotdish or casserole?


Taco Hotdish -  Serves 4-6  people, can be doubled to serve 8-10
Click HERE for a printable version

1 lb. ground beef
1 can of crescent rolls
1 package of taco seasoning
3/4 c, water
2 c. taco chips- crushed
4 large tbsp. of sour cream
1 c. shredded mexican cheese

Brown the hamburger, drain any fat.  Add taco seasoning and 3/4 c. water, cook until water is almost evaporated and mixture is thickened.  Press crescent rolls into bottom of greased 8 x 8 pan.  Sprinkle 1 c. of crushed taco chips on top of the crescent rolls.  Pour the meat mixture on top of the taco chips.  Spread the sour cream on top of the meat mixture.  Layer the shredded cheese on top of the sour cream and finish with the remainder of the taco chips.  Bake at 350 for 30 minutes until browned on the edges.  Let sit for 5 minutes before serving.  Add any condiments that you prefer such as:  lettuce, tomato, black olives, sour cream, salsa, etc.