Our version of the pillowcase dress has been a long time in creation. Actually, the creation part of making the dress was simple. It was getting the model to cooperate for the pictures that was the long time. My darling granddaughter is our model and she just didn't want to wear that dress, however, once she put that dress on, she wouldn't take it off - kids!! The weather has finally cooperated and this dress is a perfect fit for a nice summery day! We think it would also make a very fun swimsuit cover-up.
We had this great fabric at the shop with a border on it and decided that a kid's pillowcase dress was just the project to make. We are selling the fabric by the yard on our etsy site so if you would like to make one, two or more just let us know how much you need and we'll ship it right out. We are including fabric that coordinates for the tie at no extra charge.
Click here to purchase the fabric!
This dress pattern is written in blogging picture style - enjoy! Our inspiration for this project came from
HERE.
Fabric requirements:
1 1/4 yard of designer edged fabric creates approximate child sizes 2T-3T
1 1/2 yard of designer edged fabric creates approximate child sizes 4T-5T
1 1/2" of coordinating fabric to create the fabric ribbon/tie or 1/2" wide x 45" of purchased ribbon
Begin project by measuring the chest and from the neck to the shin of the child who will be wearing this dress/cover-up. Take the chest measurement, double and subtract 2 inches. For example: chest measurement 19 1/2 x 2 = 39" minus 2" = 37". Take the neckline to shin measurement and add 2 1/2" inches. For example: neck to shin 21" plus 2 1/2" = 23 1/2".
Cut your fabric to the chest measurement needed by the neck to shin measurement needed. In our example we cut a 37" x 23 1/2" piece (MAKING SURE THAT YOUR DESIGNER EDGE PRINT IS ALL ALONG THE BOTTOM OF THE WIDTH). You will end up with a chunk of fabric that you will not use OR if enough is leftover you can create a shirt using the same sewing instructions as the dress/cover-up. You will be measuring from the neck to the top of the thigh instead of the shin to get the proper length needed and
taking the chest measurement, double and subtract 7 inches. For example: 19 1/2" x 2 = 39" minus 7" = 32"
 |
| Fabric cut to correct measurements. |
Join wrong short sides together (width direction), sew a 1/4" seam down the short side (creating a tube), turn wrong side out and sew a 5/8" seam along the same 1/4" seam just created. This method is a french seam. They are our favorite way to finish seam allowances within garments because they give a nicely finished edge without having to zigzag or serge. On the fold edge (opposite side of seam just created) stitch a 1/4" "fake" seam along the short side. This method creates a more polished look with both sides of the garment having "seamed" sides. Turn right side out.
 |
| To create a french seam, sew wrong sides together first with a 1/4" seam allowance, than turn wrong sides out and stitch a 5/8" seam allowance. Turn right side out and you will see that your raw edges are inside the seam you just created. |
 |
| Creating french and fake seams for the sides of the garment |
To create the hem, fold under the designer edged print side a 1/4" twice and top stitch. This will create a nicely finished hem edge.
 |
| Fold over 1/4" twice and top stitch for garment hem |
 |
| Finished hem |
Next is to make the arm holes. Fold the garment in half lengthwise so you can cut out both armholes at one time. For the 2T-3T cut down 4 1/2" inches from the top of the fabric and 2 inches from the sides. Using a chalk pencil connect the two markings, rounding the corner as shown in the example. (For sizes 4T-5T cut down 6 inches from the top and 2 inches from the side.) Cut along the chalked lines. Fold under 1/4" twice on the cut edges of each arm hole and top stitch. To make this process easier, we suggest you press well after each fold, pin and sew slowly so that your stitching seam is straight and even.
 |
| Measure for arm holes. |
 |
| Connect the top and side measurements with a marking device of your choice . You will be cutting on the line. |
 |
| Arm hole cut out. |
 |
| Folded arm hole edge, pinned in place, ready for stitching |
To create the casing at the neck for the ribbon/tie, fold down 1/4" from the top of the front and stitch a small hem. Repeat for the top of the back. Fold down 1" again on the top of the front and top stitch. Repeat for the top of the back.
 |
| Folded under edge on the top of the garment - ready for top stitching - repeat this process for back. |
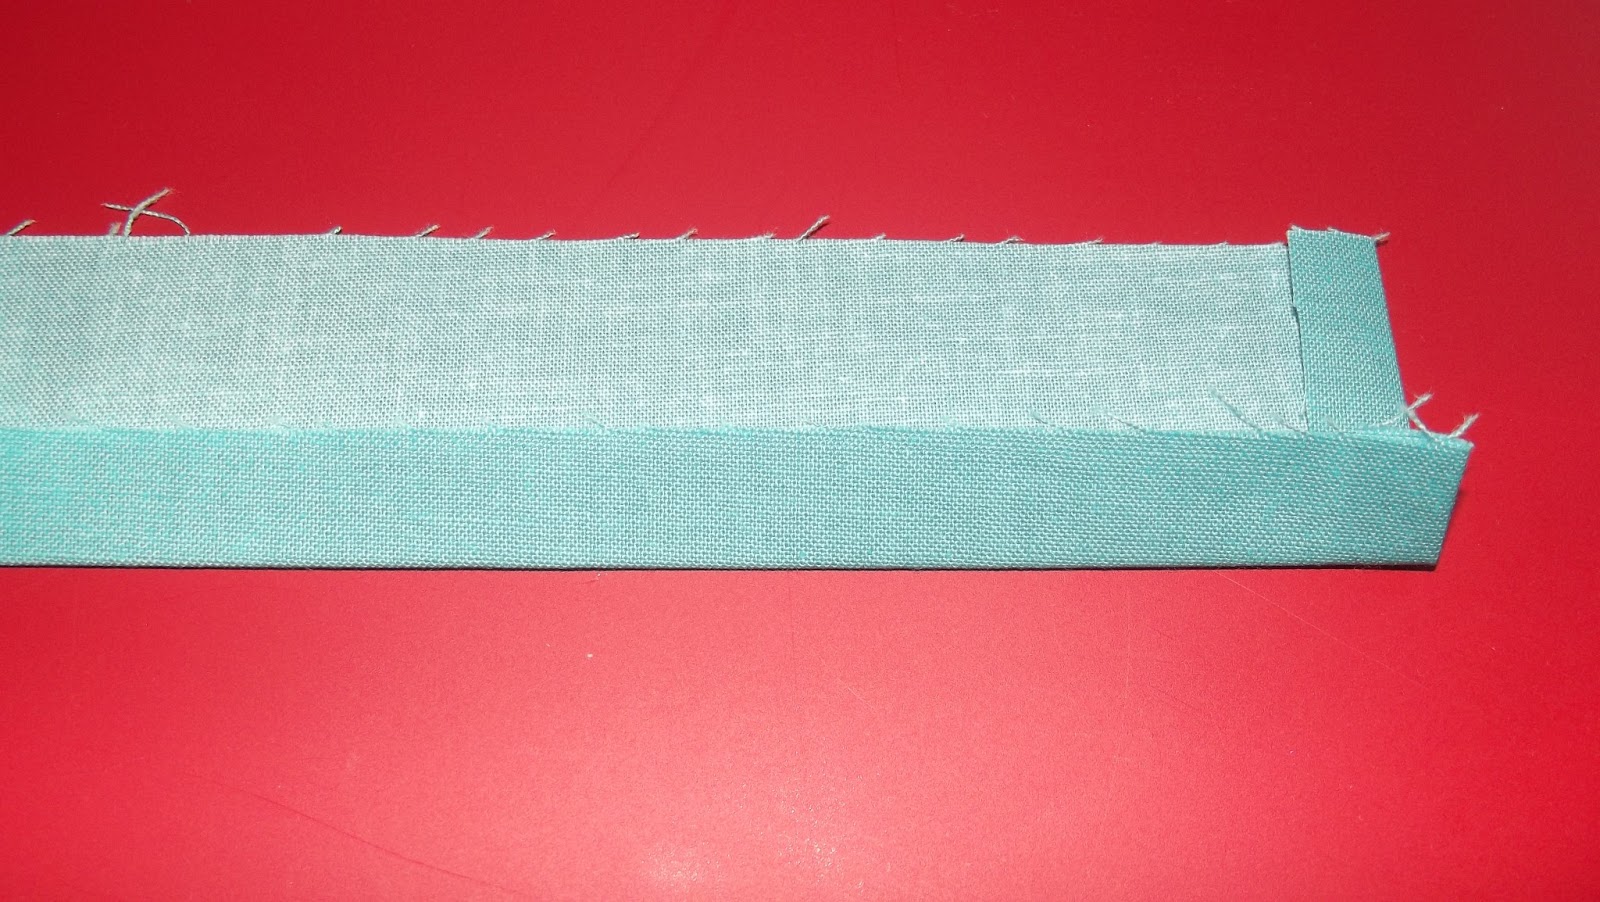
To create the fabric ribbon/tie, fold over 1/4" on both short sides. Fold over 1/4" on both edges of the long sides, meet the two folded edges together, fold again encasing the raw edges and top stitch creating a fabric ribbon/tie.
 |
| Fold over 1/4" on short side of ribbon/tie - do on both short sides. |
 |
| Fold over 1/4" on long sides of ribbon/tie - do on both long sides. |
 |
| Meet long sides together - fold together encasing the raw edges. |
 |
| Stitch down entire length of the long sides. |
 |
| Ribbon/Tie! |
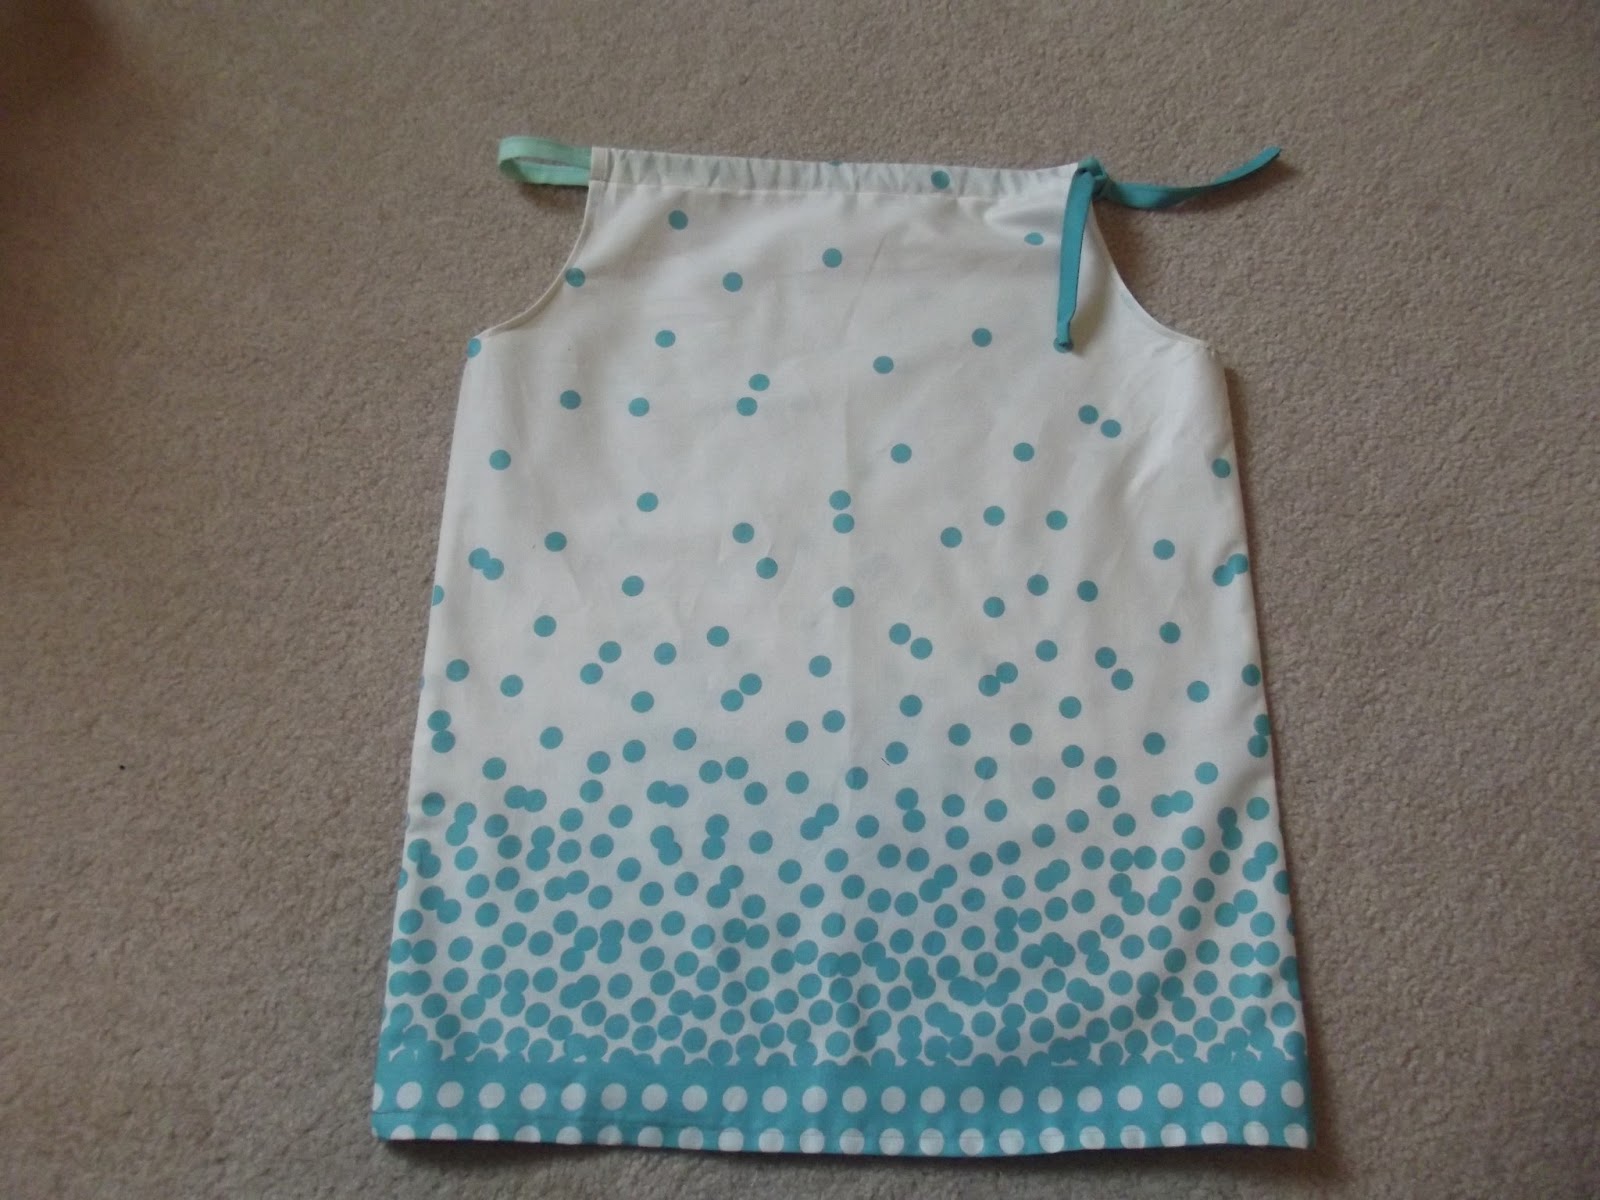
Insert the fabric ribbon/tie through the front casing and then around through the back casing. There will be a loop of fabric ribbon/tie connecting the front and the back. Place garment on child and cinch up the ribbon/tie creating gathers at the neck front and back and tie a knot or bow.
 |
Finished garment!
|


No comments:
Post a Comment